Basic Preventative Maintenance
The New Rigs . . .
Preventative maintenance is a breeze with a new vehicle. I will start with just a few words about that shiny new rig parked in your garage – for those of you who have one, we don’t want you to feel left out 🙂
If your rig is new, or even fairly new, likely it’s still under warranty. If so, you won’t have much (anything actually) to do that will get your hands dirty. Visual checks mostly. Check the oil and water – take a peek at the engine while you’re under the hood (the bonnet for those of
you in the know . . .) to see that there are no oil or other fluid leaks. Take a quick look on the ground/floor where you normally park your rig to see if there are any signs of oil or other fluid leaks. Unlikely, but check anyway. Check brake fluid level and auto transmission fluid if you have an automatic. See that the windscreen washer reservoir is full. Check the battery.
This whole process should be very quick. When a vehicle is still new, it is not likely that any of these will require attention between services. However, it is always good to be in the habit of doing these checks regularly.
Then a quick walk around to see that everything on the outside is ship shape and have a look at the tires. Depending on what tires you have on, again, you are not likely to have any issues during your warranty period. It’s a good idea though to check tire pressure regularly as this can affect both tire wear and fuel economy. You can get the correct pressure from your owners manual. Not much else really.
And the “Real” 4×4’s
Here’s where it gets real. The rig that’s past warranty, sometimes well past but still doing the “hard yards” as the Kiwi’s say. Preventative maintenance is a lot more important with an older vehicle. And this is for those of us who just love to get our hands dirty with fiddling and tweaking and coaxing the old girl along. Also, because, well, it’s nice to know a thing or two about how your rig works when you’re way out there off the beaten track.
There is a basic checklist that will apply to any motor vehicle and we can use that as a starting point here. Of course, just to complicate things, there are differences between diesel and gas (petrol for the rest of the world) I will comment on the differences where they may apply. For now we’ll ignore the hybrids . . .
Where to start
The place to kick things off is the owners manual. Who more qualified to advise on how to look after it than the people who made your rig right? So the owner’s manual is a good place to start when you want to lay out your own maintenance plan. There is a lot of useful information there regarding service and replacement intervals for various parts.
Most – if not all – manufacturers are going to err on the side of caution here, and some people will see this as a license to stretch the intervals. If you have that thought, slap yourself up-side the head and DON’T DO IT. That is what is what we call “false economy”. In fact, given the type of use your rig will be put to, (or should be put to . . .) shortening the service intervals is the only safe way to go. In the list that follows, if there is a more serious issue uncovered during an inspection or service, the remedy will be the subject of a future post. Okay, so here is a basic list you should be going through regularly divided between visual checks and actionable service processes. Most of the points below will apply to all vehicles, however, I will list a few that are specific to 4x4s.
Servicing – A Checklist:
-
Regular visual checks:
- Check fluids – check the levels as well as for leaks: Engine oil, Auto Transmission Fluid, Power steering fluid, Brake fluid, Coolant, Windscreen washer. This is fairly straight forward and easy. Most fluid receptacles will either have markings indicating full and low etc or there will be “dipstick” of some description indicating a safe range. Your manual will show you where to look for these. Get into the habit of checking these at least once a week. The first 2 photos below show the fill and check points for the various fluids as well as the battery. This is my old 80 series Cruiser.
- Check tire pressure and wear. Always have a pressure gauge in your glove box. Check tire pressure once, preferably twice a month. Look for signs of unusual wear and tread depth. The law requires that you have at least 2/32″ tread depth. Here’s a real nifty way to see if you’re okay with your tread depth.
- Check radiator & other hoses for cracks and leaks. Your manual will have guidelines on how often to change these. If they are leaking before then, obviously change them. If the replacement interval arrives and they are not leaking, change them anyway, false economy and all that.
- Check belts. Your manual will suggest change intervals. If you grasp the belt and twist to the side so that you can see the inside surfaces, you should be able to see if there are any cracks. Also, if the bearing surfaces are real shiny, it’s a good idea to change the belt.
- Check wiper blades. It’s easy to see if your wiper blades are worn. When they no longer deliver a nice, clean sweep, they need to be replaced. The job is quick and simple.
- Check battery – acid level and corrosion on connections. See number 5 in second photo below. The 2 posts are marked. In front of the posts you will see the covers, remove to check the acid level. The photo shows some minor rusting on the positive post, a good time for me to whip that off and give it a clean . . .
- Check lights. See that the headlights are working on bright and dim. Ensure all indicator lights and tail/brake lights are working. Replace any bulbs that are not working. It’s a good idea to carry some spares in the glove box.
- Check brake pad/shoe wear. You have a little work to do here. You need to remove your wheel to get a look at the brake caliper that holds the pads. See the 3rd photo below. The pads are marked A and the 2 metal strips marked B are “Squealer tangs”. Once the pads are worn to the level of the pins, they start to rub on the brake disc and make a squealing noise. A handy way to get your attention, however, not all pads have these. Remember safety, have secure stands under the vehicle after you jack it up to remove the wheel/s.
-
Regular Servicing:
- Oil & filter change. Probably the most regular service you will be doing. All the details regards intervals, grade of oil and filter specs you will find in your owners manual. Do not change the oil with the engine hot as you could burn your lily white hands. There are various “engine flush” products that you can use to help clean out any sludge and deposits before you drain the old oil. Usually, you add the product to your engine, run it for 5 minutes, then drain the oil but make sure to allow the engine to cool sufficiently before doing so. In the “olden days” it was recommended that you wipe a little clean oil on the new oil filter rubber seal before installing. Nowadays, most filters have the seal already lubricated but check to make sure. Some guides recommend filling the new filter with oil before fitting, this only works for those that mount vertical. A tip – after fitting the new filter and replacing the sump plug, fill the engine to the high mark on the dipstick, then start and run the engine for a couple minutes. This fills the filter and any other empty spaces. Shut the engine off and allow to stand for a few minutes, then check the dipstick again, you will find you will need to add a little more oil.
- Fuel filter change. There are various types of fuel filters ranging from the simple in-line plastic cartridge fitted in to a section of fuel hose with hose clamps, to the more substantial metal filter bolted to the engine block somewhere. Or a paper type filter element carried in a metal housing. One important point to remember is to relieve pressure on the fuel line before removing the old filter. This can be achieved by disconnecting the power to the fuel pump or removing the fuse. This process can be more complicated with a diesel engine due to the necessity for “bleeding” the fuel line to get all the air out.
- Air filter change, cabin air filter where present. Another very simple exercise. Most filter housings have clips securing the cover that can be opened easily by hand. The new cartridge is inserted, cover re-clipped and you’re done. It is possible to clean an air filter with compressed air between replacements. Just remember to blow “against the flow” so to speak. You want to blow the dirt back the way it came, not try to blow it through the filter.
- Change spark plugs. For gas engines only, a fairly straight forward exercise. Get the specs from your manual which will also have details for torque settings to prevent over tightening. It’s also a good idea to smear a little “Copper Slips” or similar lubricant on the threads to prevent seizing.
- Rotate tires (Balance & check alignment if necessary) A simple procedure, swapping the more worn set around with the less worn set. Remember, with radial tires, keep the tires on the same side of the vehicle. Front to back and visa versa and never from the left to right or right to left of the vehicle as this will reverse the direction of rotation
- Grease drive shaft U/joints & steering knuckles etc. Can be a little ticklish this one. You may have turn the drive shaft a little to be able to access to the grease nipple. Again, your manual will have the specs on what type of grease to use and the interval.
-
Other considerations:
- Loose, worn or damaged parts. Banging about on bumpy roads has the habit of loosening the most secure bits and pieces. You can also damage stuff. Check for anything loose or damaged and fix it.
- Accumulation of dirt and debris. We all like to clean or rigs form time to time, some of us more fussy than others. However, what we can forget sometimes is the gunk we don’t see. Out of sight, out of mind, down under in all the nooks and crannies. You need to give the underside of your rig a good once over regularly. Mud and debris building up on and around the chassis and between the chassis and body can result in sever rusting. Get it out before it causes any damage.
- If you’ve done any driving through water deep enough to submerge the axle, check the diff oil. In water this deep, it is possible for water to enter the diff through the breather on top.
- Mounted accessories. Roof racks, bull bars, custom bumpers with fitted winches, tire carriers – anything that is fastened to your rig, it can come loose. Tighten it. After a trip, check every bolt and fastener to make sure they are secure.
- It is recommended that you drive at least 10 miles a month in 4wd mode. This applies only to “part time” 4wd vehicles and is to ensure that the transfer case and front differential are lubed up regularly which helps reduce unnecessary wear. Due to the nature of the 4wd system and different speeds of front and rear wheels, it is not advised to drive in 4wd mode on dry pavement. However, if you do, keep your speed down and try to drive on a straight stretch of road. Best option of course is to get some regular off road 4wd action. Full time 4wd’s take care of this issue with an extra “center differential”.
And finally, a disclaimer . . .
It is impossible to get more specific when describing the checks and service procedures as every make and model vehicle is different. For the checks and procedures described here, you will find most if not all the information you need in the owners manual for your particular vehicle. Once things get more serious, it is a good idea to invest in a Haynes or similar workshop or repair manual.
Lastly, other than information repeated from a source such as a vehicle owners manual, all of the content is my own opinion or derived from my own experience. It does not constitute expert advice and in the case of any conflict or doubt, please follow the instructions in your particular vehicles service and repair manuals.
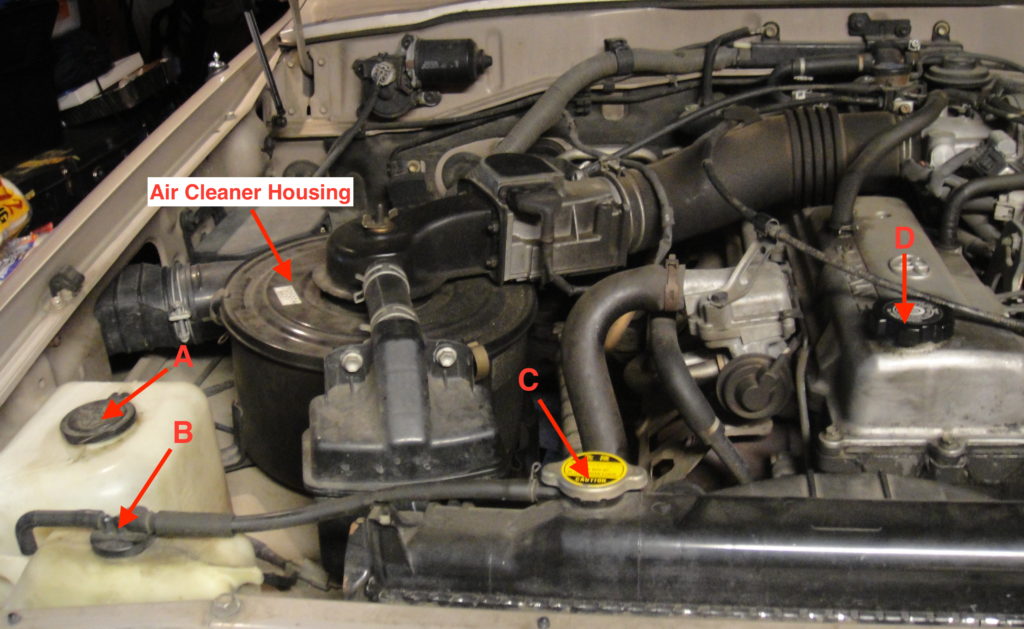
- A – Windscreen Washer Tank
- B- Coolant Expansion Tank
- C – Radiator Cap
- D – Engine Oil Filler Cap
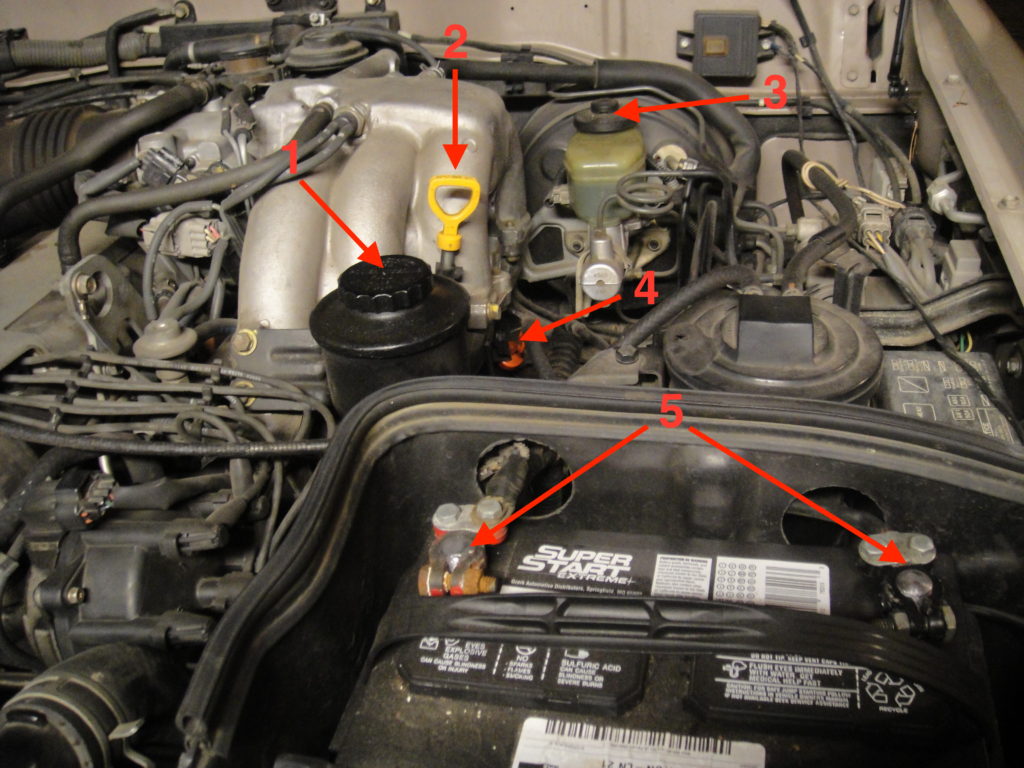
- 1 – Power Steering Reservoir
- 2 – Engine Oil Dipstick
- 3 – Brake Fluid Reservoir
- 4 – Automatic Transmission Fluid Dipstick
- 5 – Battery +/- Posts
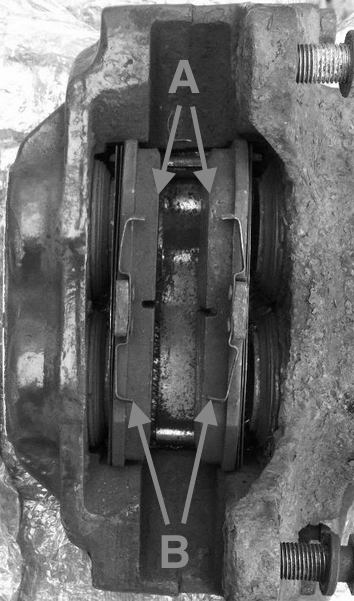
- A – Brake Pads
- B – Squealer Tangs

